Everyone loves paper airplanes! They’re a classic childhood activity that never gets old. And with so many different designs and instructions out there, it can be tough to know where to start. That’s why we’ve gathered some of the best origami airplane instructions and paper templates for you to explore!
- Classic Paper Airplane
 Let’s start with the basics: the classic paper airplane. This design has been around for decades, and for good reason - it’s simple to make, but can fly surprisingly far and straight if folded correctly.
To start, grab a rectangular sheet of paper and fold it in half lengthwise. Unfold it, then fold the top corners down to the center line. Fold the resulting corners down again to create a point at the top of the paper. Then, fold the entire paper in half along the center line, making sure the point at the top remains in place. Finally, fold the wings down at a 45-degree angle from the bottom of the center fold.
- Best Paper Airplane for Distance
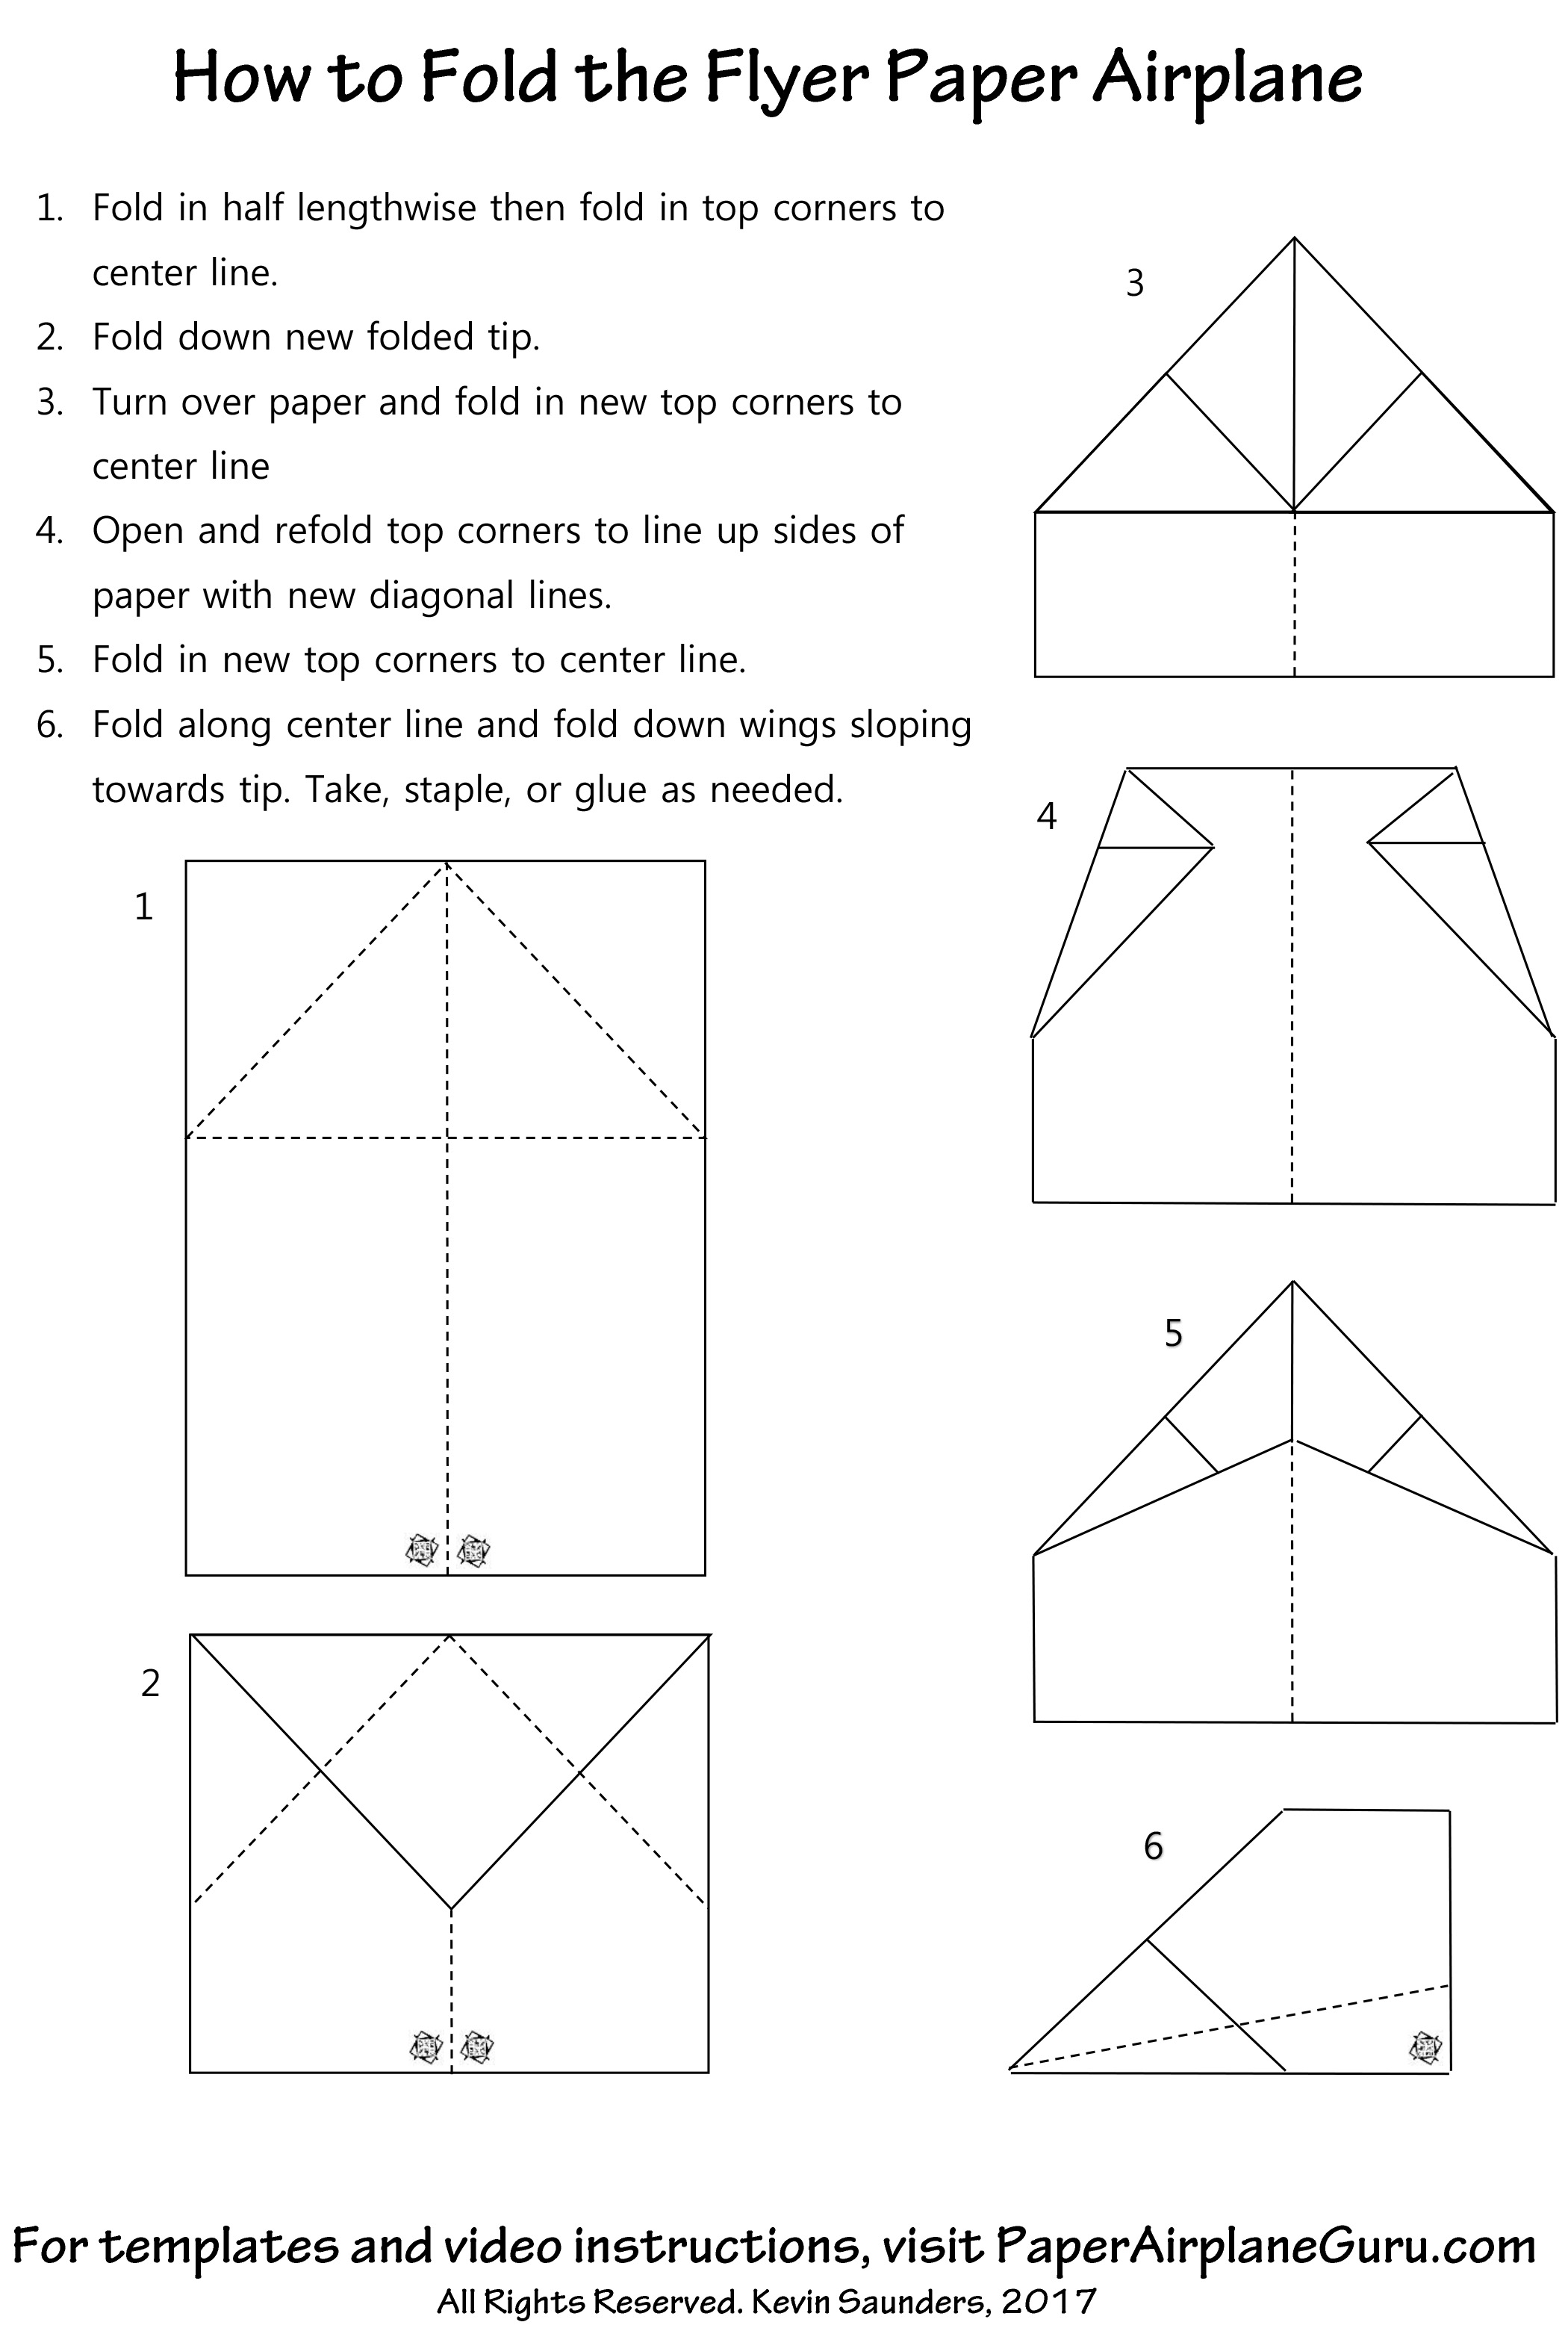 If you’re looking for a design that can really soar, this is the one for you. The instructions are a bit more complicated than the classic paper airplane, but the end result is worth it.
Start by folding a rectangular sheet of paper in half lengthwise, then unfold it and fold the top corners down to the center line. Next, fold the top edges down again to the bottom of the previous folds. Then, fold the paper in half along the center line, making sure the top point stays in place. Fold the wings down at a 45-degree angle like with the classic airplane, but then fold them up again at a 45-degree angle from the top of the previous fold. Finally, bend the wings up near the tips to create airfoils.
- Xplorer Paper Airplane Design
 If you like a bit of creativity with your paper airplanes, check out this template. It has a unique folded body and stubby wings that make it look like a miniature jet.
Start by folding a rectangular sheet of paper in half lengthwise, then unfold it and fold the top corners down to the center line. Next, fold the bottom corners up to the top edge. Then, fold the resulting points down to the center line, creating a triangular nose. Fold the paper in half along the center line, but only crease the bottom half. Fold the wings down at a 45-degree angle from the bottom of the center fold. Finally, fold the rear corners up to create diagonal stabilizers.
- StratoLauncher IV
 If you’re serious about paper airplane design, the StratoLauncher IV is a must-have. This kit includes both instructions and an adjustable launcher, allowing you to send your airplanes soaring up to 100 feet in the air!
The included instructions detail how to fold a simple airplane design, but with the added bonus of a nose weight to help keep it stable in flight. Then, simply attach the airplane to the launcher and pull the trigger to watch it fly higher than you ever thought possible.
- Hammerhead Paper Airplane
 This is another unique design that’s sure to impress your friends. The hammerhead paper airplane looks like a cross between a shark and a plane, and can fly surprisingly well given its odd shape.
To start, fold a rectangular sheet of paper in half lengthwise, then unfold it and fold the top corners down to the center line. Next, fold the top edges down to the bottom of the previous folds, then fold them in half again towards the center. Fold the top “humps” of the paper down to create a point at the top of the paper. Fold the paper in half along the center line, making sure the point stays in place. Fold the wings down at a 45-degree angle like with the classic airplane, but then fold them up again at roughly a 45-degree angle from the top of the previous fold. Finally, create a “nosecone” by folding the top of the point down towards the center, then bending it forward sharply.
- Avion Paper Airplane
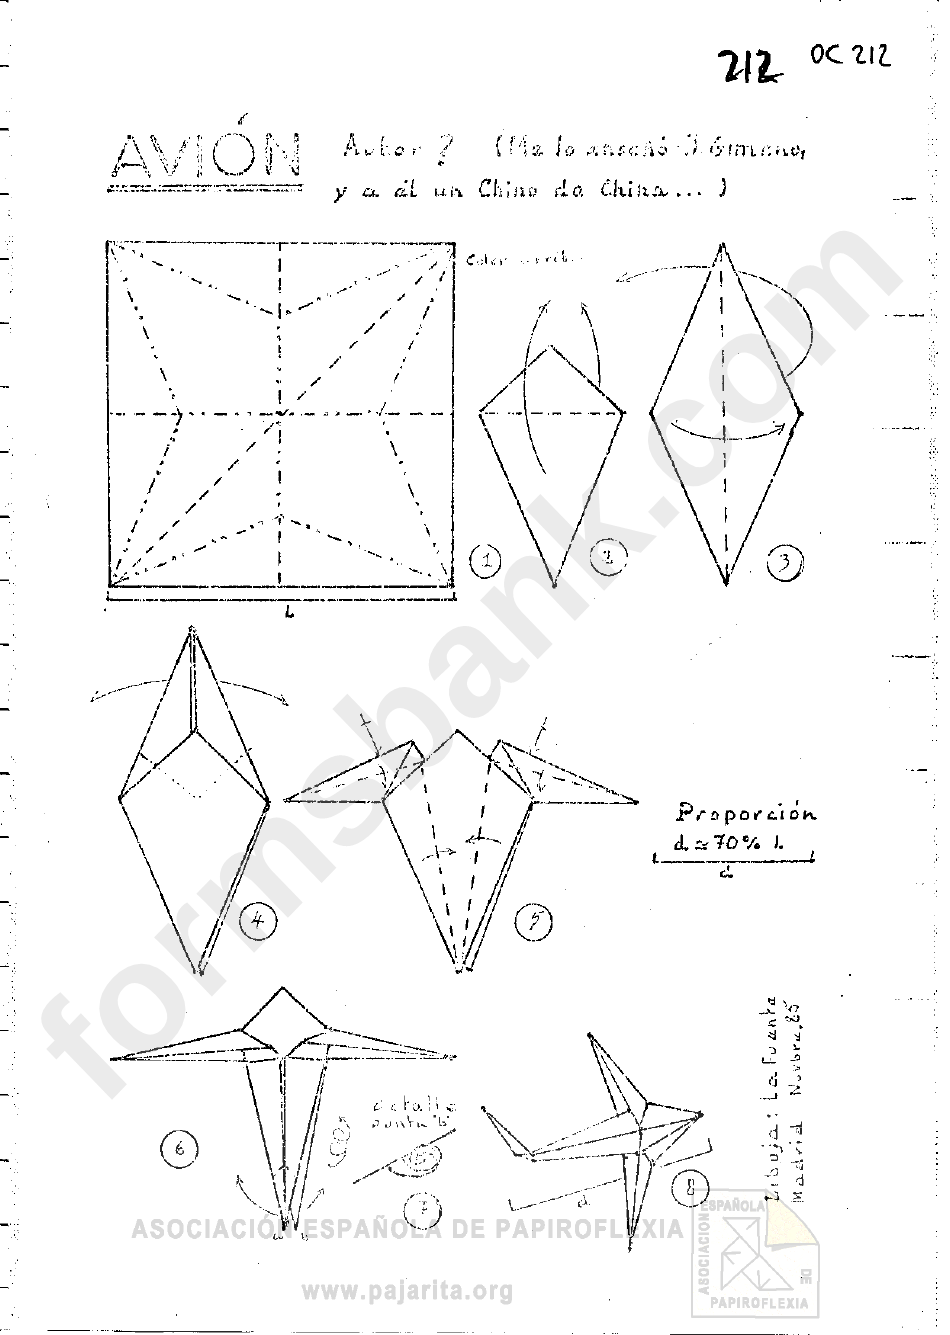 For a sleek and streamlined look, try out the Avion paper airplane design. It has a pointed nose and swept-back wings, kind of like a mini fighter jet.
Start by folding a rectangular sheet of paper in half lengthwise, then unfold it and fold the top corners down to the center line. Next, fold the top edges down to the bottom of the previous folds. Fold the paper in half along the center line, but only crease the top half. Fold the wings down at a 45-degree angle like with the classic airplane, but then bend the tips upwards slightly. Finally, fold the rear corners up to create diagonal stabilizers.
- Concord Paper Airplane
 The Concord paper airplane takes its inspiration from the supersonic jet of the same name. It has a sweeping nose and delta-shaped wings for a unique look.
Start by folding a rectangular sheet of paper in half lengthwise, then unfold it and fold the top corners down to the center line. Next, fold the top edges down to the bottom of the previous folds, then fold the resulting points down to the center line, creating a triangular nose. Fold the paper in half along the center line, but only crease the top half. Fold the wings down and back again, creating a triangular delta shape with the point at the back. Finally, bend the tips of the wings up slightly to create airfoils.
- Hornet Paper Airplane
 The Hornet paper airplane has a unique “boxy” shape that really makes it stand out. Its stubby wings are perfect for sharp turns and quick maneuvers.
Start by folding a rectangular sheet of paper in half lengthwise, then unfold it and fold the top corners down to the center line. Next, fold the top edges down to the bottom of the previous folds, then fold those points down to the center line as well. Fold the paper in half along the center line, but only crease the bottom half. Fold the wings down and back at approximately a 45-degree angle, then bend the tips up slightly to create airfoils.
- The Perfect Paper Airplane
 While the previous designs are all great in their own way, sometimes you just want something that will fly well every time. And that’s where the Perfect Paper Airplane comes in!
This design is a bit simpler than some of the others, but with some clever folding and a bit of tweaking, it can be transformed into a champion flier. Start by folding a rectangular sheet of paper in half lengthwise, then unfold it and fold the top corners down to the center line. Next, fold the resulting points down to the bottom of the previous folds, creating a triangular nose. Fold the paper in half along the center line, but only crease the top half. Fold the wings down at a 45-degree angle like with the classic airplane, but then bend them up slightly near the tips to create airfoils. Finally, adjust the angle of the wings and tail until you achieve the perfect balance for your airplane.
So there you have it - nine different paper airplane designs to explore! Whether you’re a novice or an experienced folder, these instructions and templates are sure to provide hours of fun and experimentation. So next time you’re looking for a simple, cheap, and entertaining activity, grab some paper and start folding!