Origami is a timeless art form that has captivated people of all ages for centuries. The word “origami” comes from the Japanese words “oru,” meaning “to fold,” and “kami,” meaning “paper.” Origami is a beautiful way to express creativity and bring joy to others. With just a few folds of the paper, one can create something truly magical – a delicate flower, a beautiful bird, or even a fierce ninja star!
Origami Ninja Star
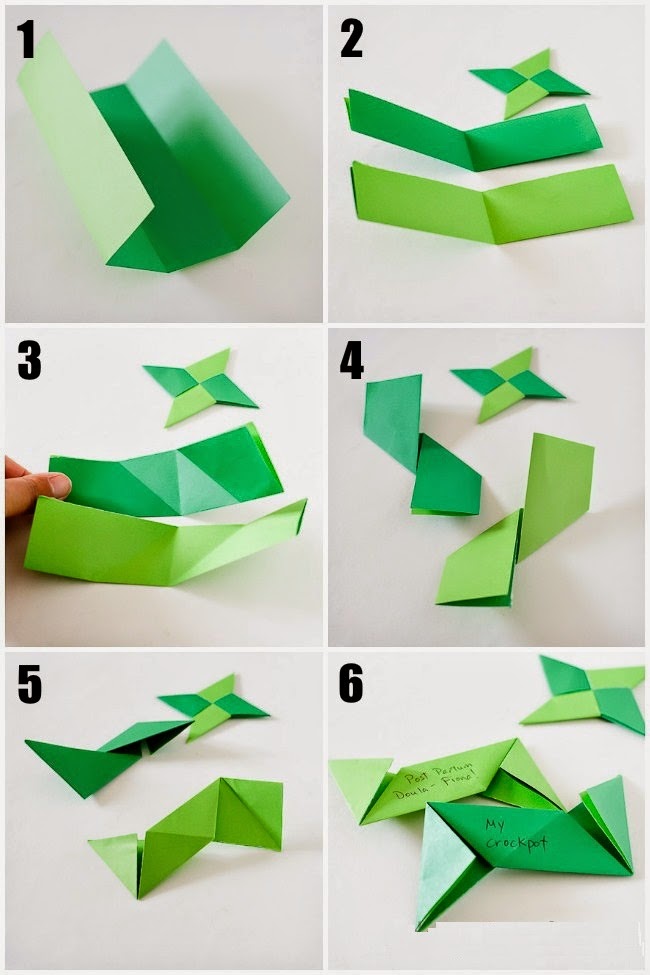 The origami ninja star is one of the most popular and iconic origami designs. It is also known as the “shuriken” or “throwing star.” This design is perfect for beginners, as it only requires two sheets of paper and a few folds.
Start with two sheets of square paper. Fold both sheets in half diagonally, crease well and open the papers again. Fold each corner of both sheets to the center crease. Fold the paper in half and turn it over. Fold each corner into the center crease. Take the top layer of the bottom corner and fold it up, so the edge aligns with the center crease. Repeat on the other side. Fold in half and tuck one corner under the other. Repeat with the other piece of paper. Connect the two pieces together and you have yourself a ninja star!
Origami Frog
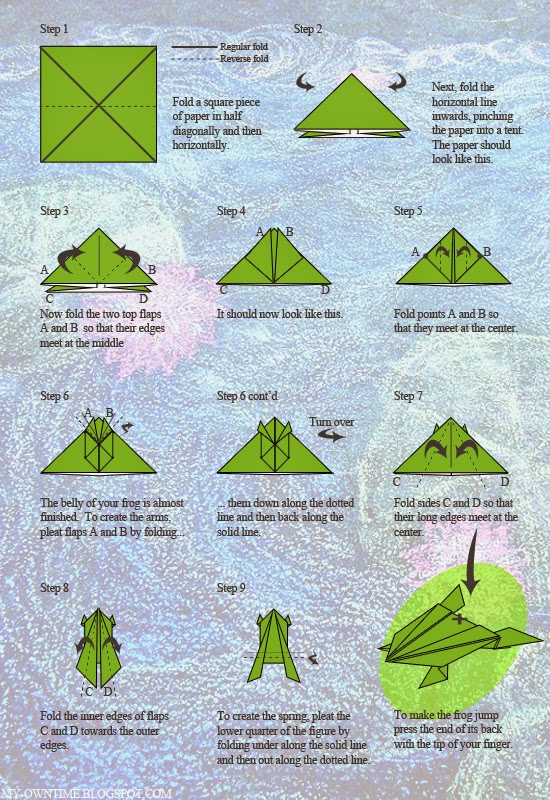 The origami frog is a fun and easy design that is perfect for children. It only requires one sheet of paper and a few simple folds.
Start with a square sheet of paper. Fold the paper diagonally in half and then fold the two corners of the shorter edge to the center crease. Fold the top layer of the bottom corner of the paper to the center crease. Then fold each corner of the top layer diagonally in towards the center of the paper. Flip the paper over and fold the bottom edge up to the top edge. Position the fold so that it is just below the small triangles made earlier. Fold the top point of the paper down to the bottom edge of the paper. Flip the paper over and your frog is complete!
Origami Dragon
 The origami dragon is perhaps one of the most challenging designs in origami, but it is also one of the most beautiful. This design requires more time and skill, but the end result is well worth the effort.
This dragon requires a square sheet of paper. Begin by folding the paper in half diagonally and then unfold it. Fold the paper in half diagonally in the other direction and unfold it again. Next, bring all four corners into the center crease and fold in half. Fold the wings down along the creases and fold the tail up along the crease. Lastly, fold the head down along the crease and then unfold it. Holding onto the two sides, gently pull the head and tail apart to create the dragon.
Origami Bird
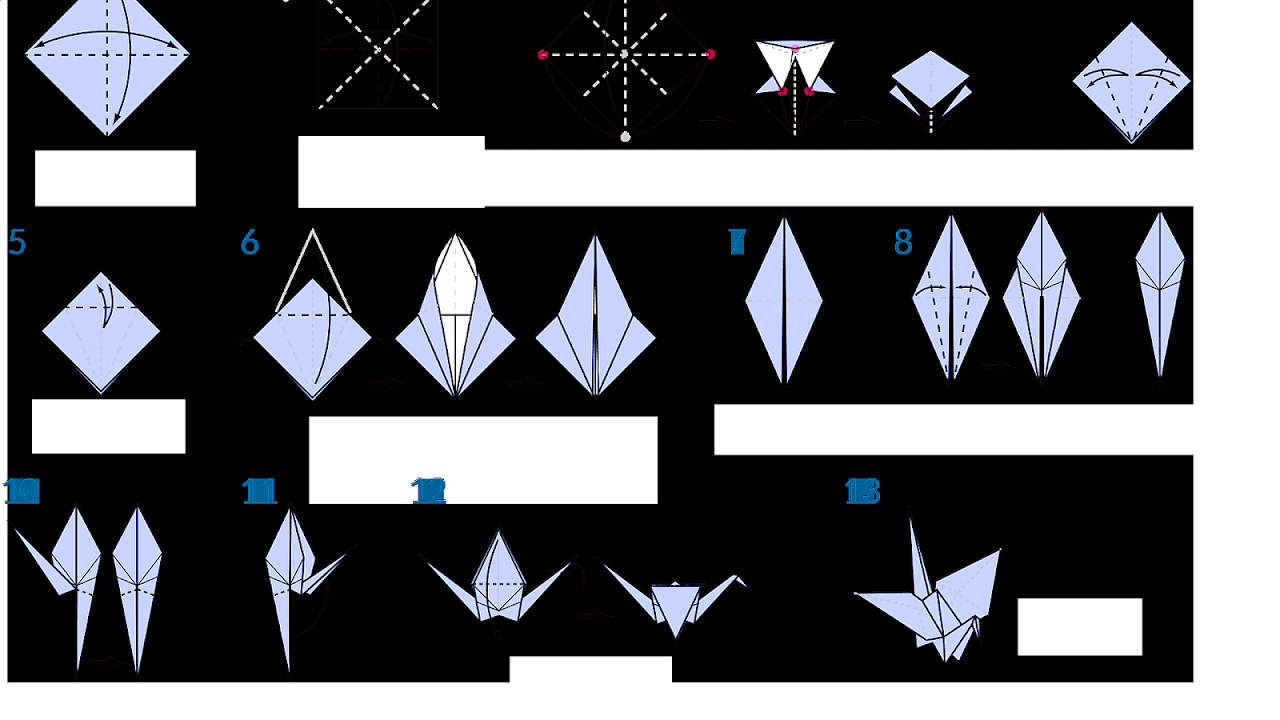 The origami bird is a classic design that is perfect for beginners and young children. This design uses just one sheet of paper and involves only a few folds.
Begin by folding the paper in half diagonally and then unfold it. Next, fold the bottom corner up to the center crease and then fold the top corner down to the center crease. Fold the right corner over to meet the left edge and then fold the left corner over to meet the right edge. Finally, fold the bottom corner up to meet the top edge and then fold the top corner down to meet the bottom edge. Pull the wings down and your bird is complete!
Origami Maltese Dog Face
 If you love dogs, this origami Maltese dog face is the perfect design for you. It is a slightly more advanced design, but the end result is well worth the effort.
Begin with a square sheet of paper. Fold the paper in half diagonally, open it back up, and fold it in half diagonally in the other direction. Fold the paper in half vertically and then open it up. You should have creases running vertically and horizontally, dividing the paper into quarters. Using these creases, form a waterbomb base by folding the corners of the top layer of paper into the center. Flip the paper over and fold the sides in to meet in the center. Fold the top part of the paper down towards the bottom edge to create a flap. Turn the paper over, then fold the exposed points of the flap towards the bottom of the paper. Take the diamond-shaped flap at the bottom and fold it up along the centerline. Finally, fold the top corners down to create the ears. Now you have an adorable Maltese dog face!
Origami Dog
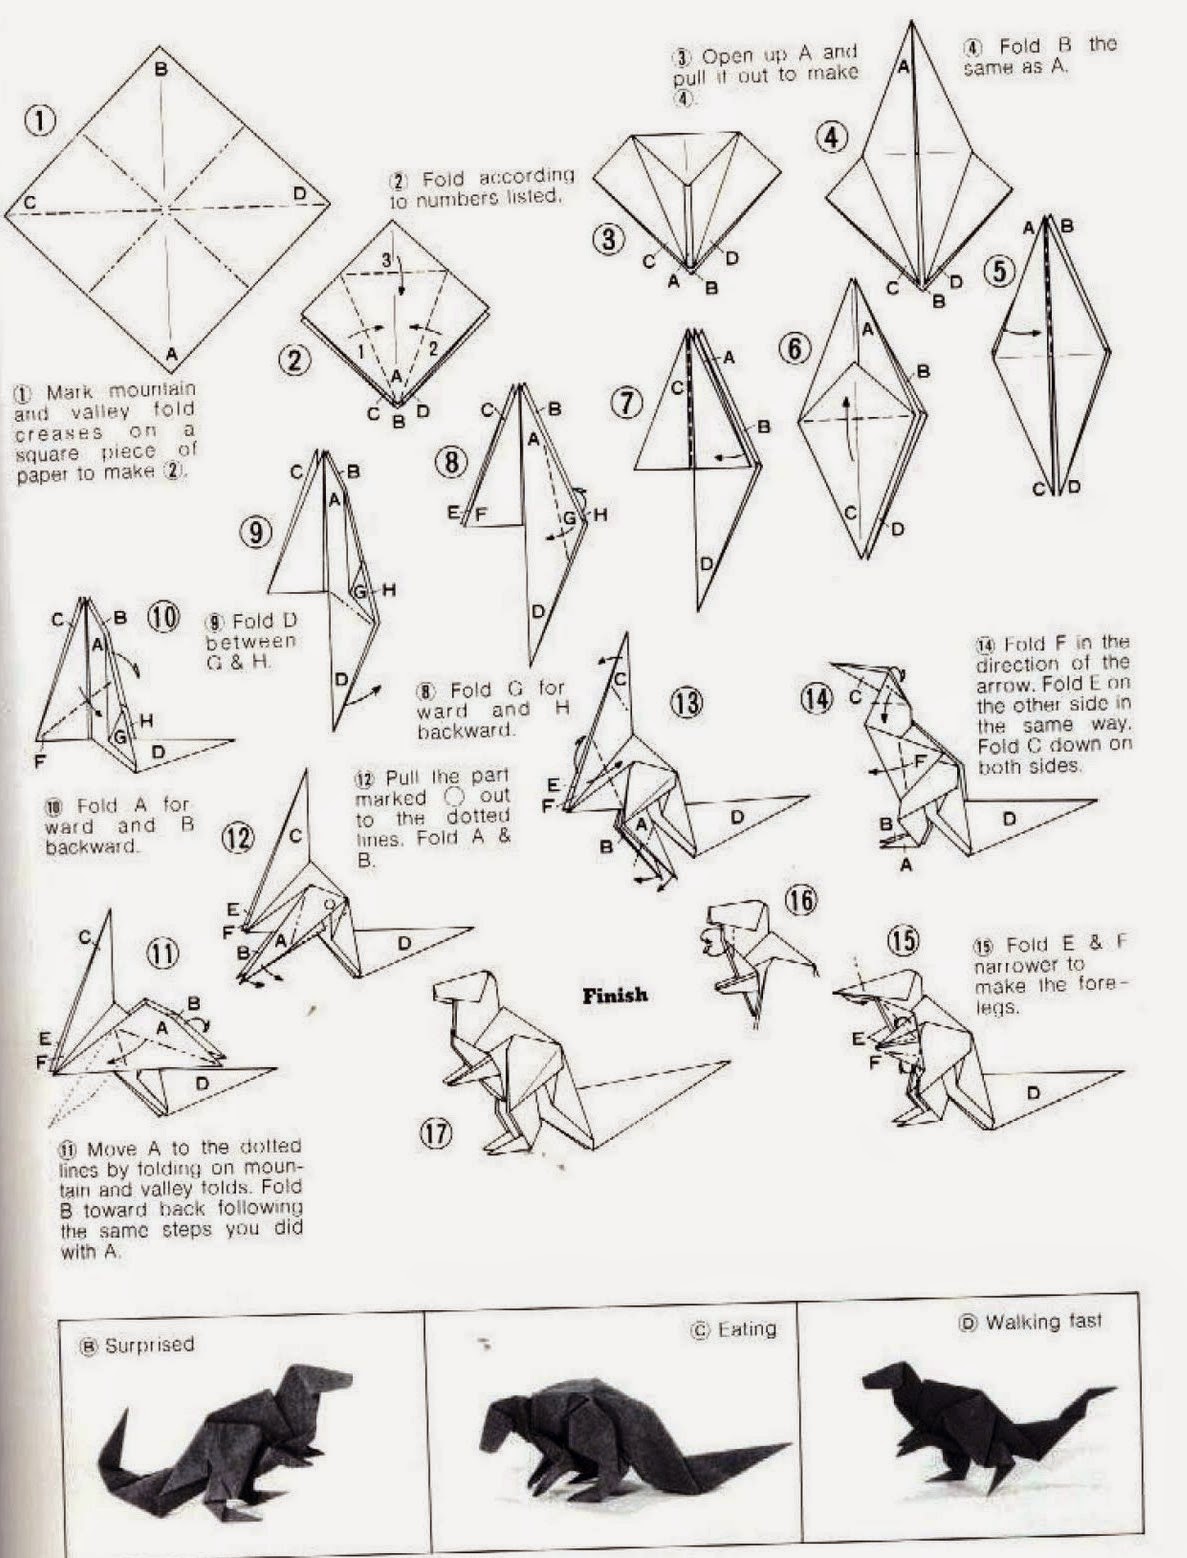
 The origami dog is another design that is perfect for those who love animals. This design is slightly more advanced, but with a little patience and practice, anyone can create this adorable pup.
Begin with a square sheet of paper. Fold the paper in half diagonally in each direction to create an X-shaped crease pattern. Then fold the paper in half horizontally and vertically, and unfold it again to create a grid. Fold each corner of the paper into the center and then unfold it. Next, fold the top edges of the model down to the center crease to create a triangle that points up. Bring the bottom edge of the model up to meet the top edge. Fold the top layer of the flap down to create the head of the dog. Then, fold the bottom corners of the model up to create the legs. Fold the tail up from the back of the paper, and then fold it down to create the tail. Lastly, fold the ears forward and your dog is complete!
Origami Box
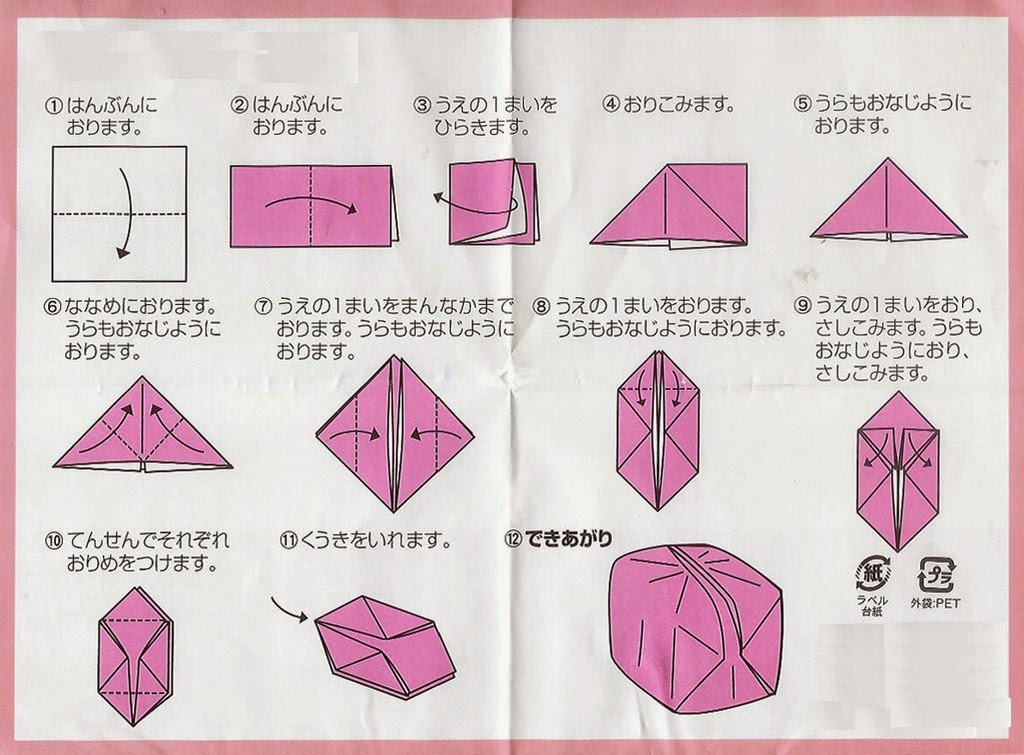 The origami box is a versatile design that can be used for a variety of purposes. It is easy to make and requires only a few simple folds.
Begin with a square sheet of paper. Fold the paper in half diagonally in both directions and then unfold it. Fold each corner of the paper to the center crease. Next, fold the right and left sides of the paper into the center and then unfold them. Flip the paper over and fold the top and bottom sides into the center. Unfold them and then fold the top and bottom edges into the center again, but this time, tuck them under the flaps made in the previous step. Lastly, pull the sides out gently to create the box shape.
Origami Shirt
 The origami shirt is a fun design that is perfect for Father’s Day or any other occasion that calls for a special gift. This design is slightly more advanced, but with a little practice, anyone can create this unique and special gift.
Begin with a rectangular sheet of paper. Fold the paper in half horizontally and then open it back up. Fold the top edge down to the bottom edge and crease it well. Fold the top edge down to the center crease, creating a collar. Next, fold the bottom edge up to the center crease and then open the top layer of the paper. Fold the top corners of the paper in to meet the center crease. Fold the bottom corners of the paper up to meet the top edge. Tuck the bottom flap under the top flaps to create the sleeves of the shirt. Lastly, fold the bottom edge up to create the hem of the shirt and your shirt is complete!
Origami is a wonderfully creative and meditative art form that can be enjoyed by people of all ages and backgrounds. We hope these printable instructions have inspired you to get folding and create something beautiful today!