Hey guys,
I was browsing through the internet and stumbled upon something super cool - making super easy friendship bracelets! Not only is this a great way to pass time, but you can also donate them to people who could use a little extra love and support. And you guys know what that means - it’s time to get crafting!
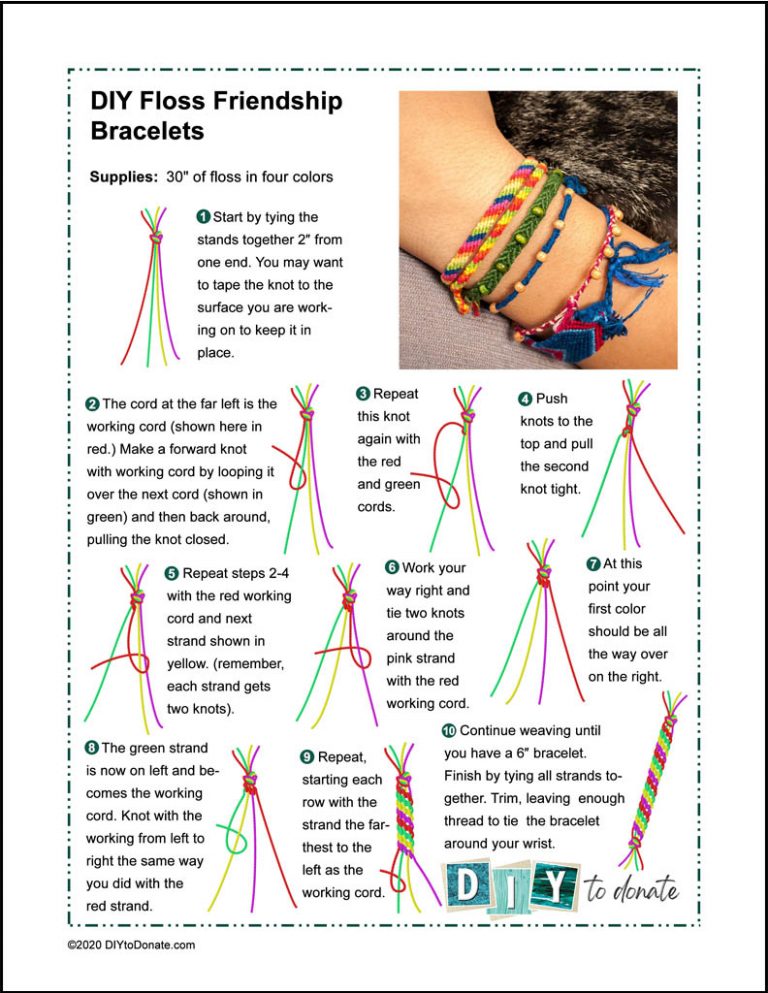
Check out this super cool tutorial on DIYToDonate:
 This tutorial has everything you need to make beautiful friendship bracelets: step by step instructions, a materials list, and even a video guide! Whether you’re a beginner or an expert crafter, you’ll have no trouble following along and creating a truly special item.
First, gather your materials:
- Embroidery floss - choose your favorite colors! (You can even mix and match)
- Scissors
- Masking tape or clipboard (to hold the string in place as you work)
Once you have everything you need, it’s time to get started!
Step 1:
Cut your embroidery floss to the desired length - somewhere between 60-70 inches should do the trick. You can always trim it down later if you need to.
Step 2:
Tie a knot at the top of your strings, leaving about an inch of slack. This will ensure that your bracelet won’t unravel while you work.
Step 3:
Attach your knot to your clipboard or tape it to your work surface - this will make it easier to keep the strings in place as you work.
Step 4:
Separate your strings into 3 strands: left, center, and right.
Step 5:
Start by making a forward knot with your left strand:
- Take the left strand and cross it over the center strand, creating a ‘4’ shape.
- Bring the left strand under the center strand and back up through the hole in the ‘4’ shape.
- Pull the strands tight.
Step 6:
Repeat the forward knot with your right strand:
- Take the right strand and cross it over the center strand, creating a backwards ‘4’ shape.
- Bring the right strand under the center strand and back up through the hole in the ‘4’ shape.
- Pull the strands tight.
Step 7:
Repeat steps 5 and 6 until your bracelet reaches the desired length. Remember to take breaks and stretch your fingers!
Step 8:
To finish off your bracelet, tie a knot at the end and trim any excess string.
And voila - you have yourself a beautiful friendship bracelet! Customize it with your favorite colors and patterns, add some charms or beads - the possibilities are endless.
Now, the best part - donate your creations!
Whether you donate them to a children’s hospital, a local charity, or a shelter, your handmade friendship bracelets are sure to put a smile on someone’s face. With so much turmoil and uncertainty in the world right now, spreading love and kindness is more important than ever. So let’s get crafting and make a difference, one bracelet at a time!
Happy crafting!